Disney Nerds Getting Crafty: DIY Enchanted Rose
It’s time to get crafty Disney Nerds!
Have you ever watched “Beauty and the Beast” and thought that it would be cool to have your own enchanted rose in your home. I thought so too! So I found a way to create my own enchanted rose and thought I’d share with you my process!
Get A Jar
The first thing I did was getting a glass jar. I like to upcycle things and I decided to use a glass jar from a candle. The glass jars are great for this (or other things you might need a glass jar or vase for). If you do decide to upcycle a candle jar then you want to make sure it’s one of the candles with a lid. Once the candle is spent you have to get the remaining wax out. There are a couple of ways to do this but the best way that I’ve found is heating the jar to melt the wax and pour it out. I put a couple of inches of water in a pan or pot and then put it on the stove to boil. I don’t submerge the candle jar in the water, I place it in the water so the water surrounds the outside of the jar. Once the water starts getting hot, the wax that’s left in the jar will melt.


Clean Jar
Once it’s all melted, you want to pour the wax out of the jar. I pour it into a trash bag. Depending on how much wax was left in the jar, you might have to repeat this process. Sometimes once there’s very little wax, you can wipe the rest of it out with a paper towel. You also want to get the metal ends from the candle wick out. They are usually glued to the bottom of the jar and the same heat that melts the wax should melt the glue so they should pop off to be thrown away. Once the wax and any other remnants are cleaned out of the jar, you want to take the labels off too. I’ve found that it is easier, depending on the brand, to remove the label while the jar is still warm. I also have gotten the labels wet to remove them and used Goo Gone which is designed to remove labels and stickers. The final step for preparing the jar is washing it to make sure it’s clean. The jar should look like any other glass jar you would’ve purchased from the store once all this is done.


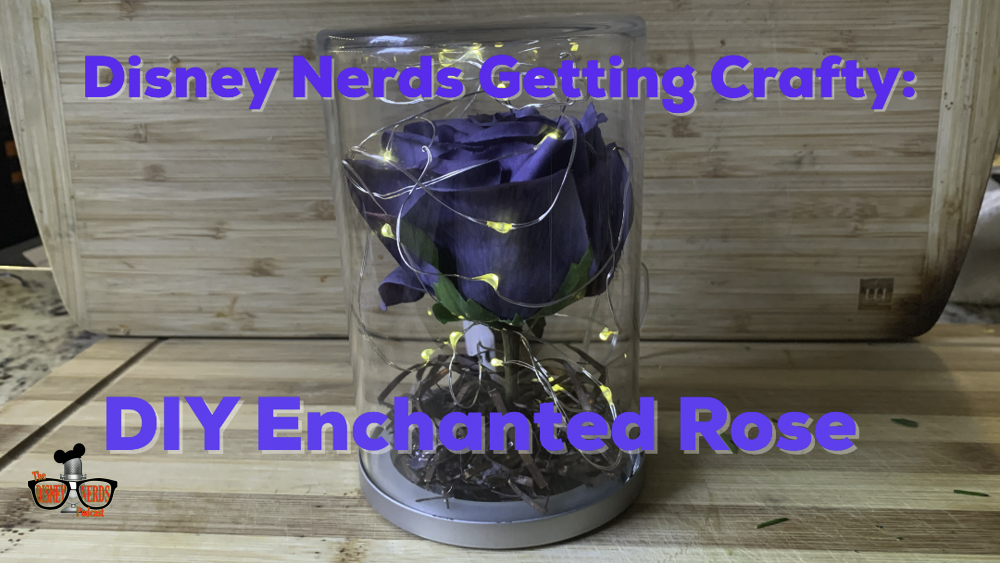
Now that you have your glass jar, you need your rose. I went to my local craft store and searched their floral section for the perfect rose. The prices of floral can vary from $1-10 so be sure to check the price and I always recommend looking for a coupon or taking advantage of a good sale. I found the rose that I wanted and I decided to go with a blue rose. It was a personal decision on my part, I felt it fit with my color décor in my home instead of a red rose. So there is no rule that says you have to choose a red rose. I recommend making sure the rose will fit perfectly in the glass jar you have. You don’t want to get a rose bigger than the jar because your rose is going inside the jar.
Fairy Lights, etc
The next thing you need is called fairy lights. They are small light on a flexible wire with a battery pack and a light switch. I purchased mine on Amazon.


I also made sure I had a hot glue gun and some floral moss or grass filler.
Once you have all of these items you can put together your enchanted rose!
In the first step, you want to size your rose to fit inside the glass jar. I had to cut the stem down in order for it to fit in the jar. You don’t want to cut it all the way down though. You want to leave extra because you are going to bend the stem and glue it to the jar lid so it will stay still inside the jar. I bent my stem in a triangle to give it a more secure base and then took the hot glue gun and glued it to the lid. I made sure the position of the rose was still going to be in the center of the jar once the lid is closed. I then wanted to hide the stem so I used the floral moss or grass filler and placed a small amount of it over the bottom of the stem to cover the glued stem on the lid. I thought this made it look a lot better.


Put it all together
After you have glued your rose and floral filler and the glue has cooled. You want to take your fairy lights and place them around the rose. The fairy lights are going to give that magical look to the rose. I made sure my lights were on when I placed them around the rose so I knew what was going to be lit up. Once you have the lights where you want them, you want to put the rose in the jar. Since the rose is glued to the lid, the lid is going to be your bottom. You also want to leave the battery pack and light switch of the fairy lights out of the jar so it’s easy to turn the lights on and off. You do want to take your time and make sure everything like the lights and filler and even the rose is exactly where you want it once the lid is on the jar. Personally, I didn’t want to have to reopen the jar all the time so I made sure that everything was placed how I wanted.


After all, is done, you can choose to seal the jar close with a bit of hot glue that way the lid will not fall off the jar. This part is up to you though. But after all, this is done you have a beautiful enchanted rose to display in your home! How great is that!?
So what do you think? Let’s see your enchanted roses! Email them to Morgan@thedisneynerdspodcast.com
Enjoy your crafting and stay tuned for more Disney Nerds Getting Crafty!


